

Nonpareils
- Dec 24, 2025
- 5 min read
Nonpareils- These festive chocolate treats can be customized for any holiday or occasion.
December 24, 2025 by Nicole Collins
Today, we’re making Nonpareils!

Ok, folks! Today, you’re getting a lesson on chocolate! But before we get started, let’s address a super confusing but important piece of information related to the candies we’re making today.
You’re going to hear the word “nonpareil” many times in this discussion, and it could be referring to two different things. Nonpareils are the name of the little round sprinkles that we’re going to use to top our candies. But, they’re also the name of the chocolate candies we’re making. Listen, I don’t make the rules…I just follow them. But, I don’t want you to think I’m losing it when I use the same name to describe 2 different things.

Nonpareil candies are the simplest treat possible…they’re dots of chocolate topped with sprinkles. That’s it! The most popular, commercialized version of this treat is Sno Caps if that helps set the scene. However, there are some rules to working with the chocolate that will help ensure the most perfect little candies.
First things first, you can make these candies with whatever kind of chocolate you prefer: milk, semisweet, or dark chocolate. I’m using dark today, because that’s my mother’s favorite. To make sure our candies have the perfect texture, we need to temper the chocolate.
There are many schools of thought when it comes to tempering chocolate. Most professionals will advise you to melt chocolate in a double boiler. I, however, am no professional. So, we’re doing this in the microwave.
The goal is to get the melted chocolate to somewhere between 89-90 degrees. And honestly, that requires a little more thoughtful planning than you’d think. Most of the time when we’re just casually melting chocolate, we’re taking it way above it’s melting point. And that’s often the reason why it seems like it’s “soft” when it sets or you can see your fingerprints in the chocolate when you touch it. Essentially, the cocoa butter crystals have been overworked resulting in a waxy, almost greasy texture when it’s heated to too high of a temp. And, we don’t want that to happen to our gorgeous little candies!
So here are some tricks: one, start with a microwave safe bowl. I like to use a glass bowl as I think it heats a little more evenly. Two, do not put all of the chocolate chips that you need to melt in the bowl at once. Save some on the side. Three, do not microwave in any longer than 15 second intervals. And four, stir stir stir like you’ve never stirred before.

I’m not going to lie to you, tempering chocolate is a little bit of a workout. The trick to know is that the chocolate is not going to look like it’s fully melted. You have to let the heat from the melted chips melt the solid chips by stirring vigorously and constantly. It’s an arm workout, but it’s the only way to make sure you’re no overheating your chocolate. It’s warmer than you think in there!
You can use a candy thermometer to check the temperature of the chocolate, but I prefer to go the less messy route and use an infrared thermometer gun (the same one I use on my pizza oven, actually). If the melted chocolate is above 90 degrees, add in a couple of the reserved chocolate chips and mix mix mix until they melt in. That will help bring the temp down. It’s way more likely that your chocolate will be too hot as opposed to too cool, but if it’s somehow under temp, don’t microwave for any more than 5 seconds at a time to get it back to temp.

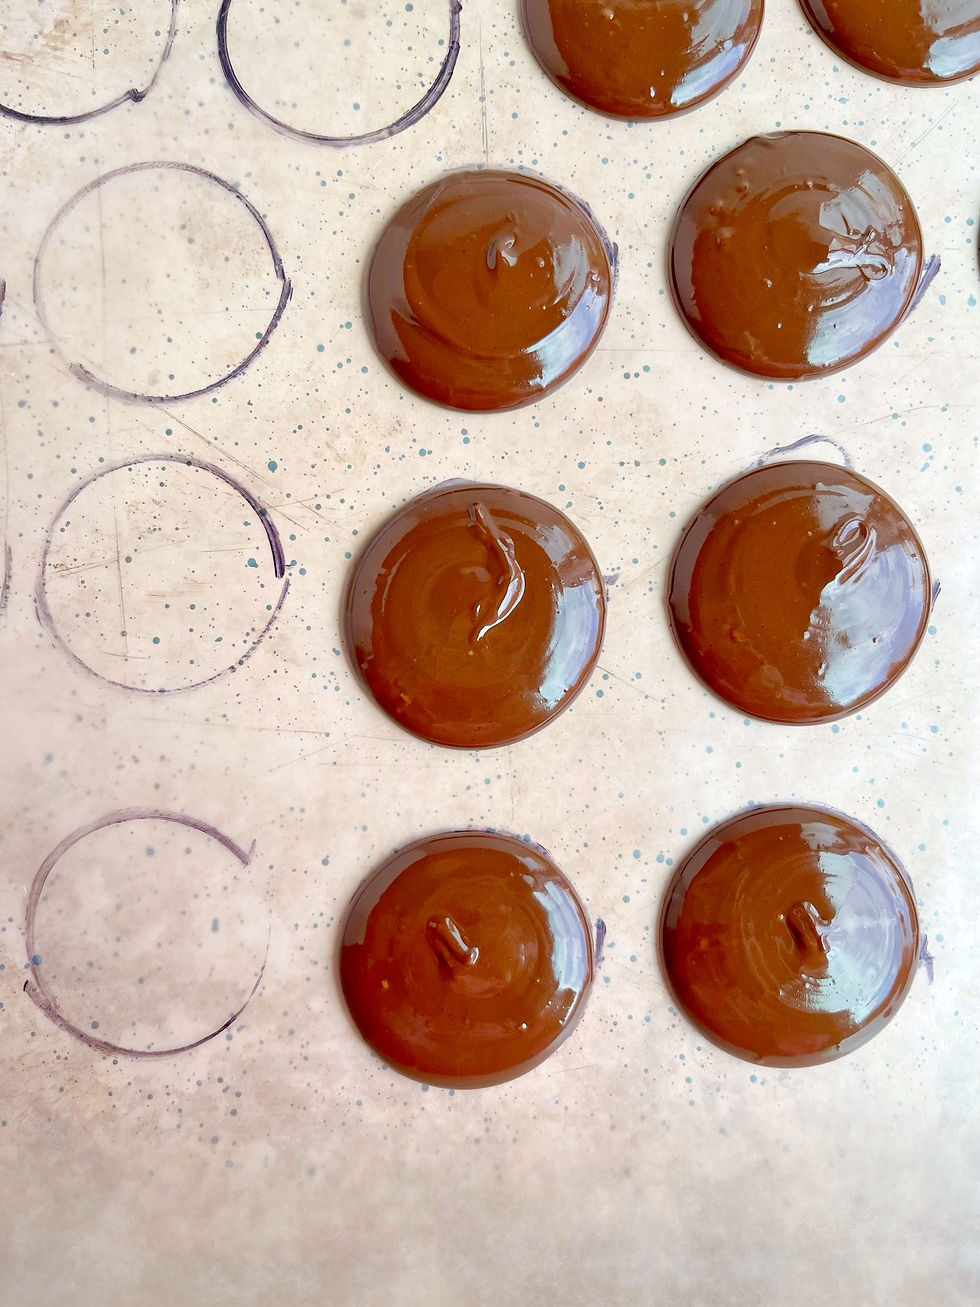
Once the chocolate is perfectly melted, I like to transfer it to a piping bag to make life easier. We need to pipe our chocolate into little circles. Now, you can go rogue on this and make whatever size circles you like. But I like them to be uniform in size, so I draw circles on some wax paper using a spice bottle cap as my guide so that I know how big to make my candies. Then I put that wax paper on a baking sheet for stability.
Put the piping tip in the center of the circle, squeeze to fill out the circle almost the whole way, repeat, then bang your baking sheet on the table to flatten out the chocolate. Then, you’re going to take a bottle of nonpareil sprinkles in whatever color you like, and cover the chocolate circles until they’re completely coated. Toss them in the freezer for 15 mins to set, and that’s it!

Because we took the time to properly temper our chocolate, these candies are the PERFECT texture. They’re firm and shiny on the bottom. They have the perfect snap when you bite into them. And they’re perfectly smooth. Not to mention, they’re absolutely beautiful!
Ok, everyone! Now that you know how to temper chocolate, we’re putting those skills to good use in the next recipe!
I hope you enjoy! And, let’s eat!

Nonpareils
Serves: 30-32 Print
Ingredients:
1 bag (10 oz) dark chocolate chips
Nonpareil sprinkles
Directions:
Draw 1 ½ inch circles on a piece of wax paper (I use a spice bottle cap as a guide), and flip over so pen side is down. Place wax paper on a baking sheet.
Place chocolate chips in a glass bowl. Use a microwave to melt and temper chocolate. Start by microwaving for 30 seconds, stir, then microwave in 10-15 second intervals as needed, stirring well between each interval, until the chocolate is melted and the temperature reaches between 89-90 degrees. If the chocolate is warmer than 90 degrees, add a few extra chocolate chips, stir well, and check the temperature again. Repeat as necessary until the chocolate reaches the correct temperature.
Transfer melted chocolate to a piping bag. Place the tip in the center of each circle, and apply pressure until the chocolate mostly fills out the circle. Tap the sheet pan on the countertop a few times to smooth out the tops of the chocolate.
Cover each circle completely in sprinkles. Freeze for 15 mins to set. Allow to come back to room temp before storing in an airtight container. Enjoy!
Recipe notes:
*Melting the chocolate to the proper temperature is important for the texture of the candy. If the chocolate is too hot, you won’t get that smooth snap when biting into the chocolate. It will almost feel waxy.
*When tempering the chocolate, stir vigorously between each interval in the microwave, and start checking the temps far before you think you should. The chips might not look like they’re melting, but a hard and constant stir will have them melt right before your eyes. It’s an arm workout, but it’s necessary to keep your temp from getting too hot (which happens so quickly). If the chocolate is too warm, add in fresh chocolate chips and stir stir stir til that temp comes down.
*I use an infrared thermometer gun to check the temp on the chocolate.
The Yummy Muffin is a participant in the Amazon Services LLC Associates Program, an affiliate advertising program designed to provide a means for us to earn fees by linking to Amazon.com and affiliated sites. I provide links to products that I use by my own choice, and all opinions are my own. Thank you for your support!


Mình có lần lướt đọc mấy trao đổi trên mạng شيخ روحاني thì thấy nhắc nên cũng tò mò mở ra xem thử cho biết. Mình không tìm hiểu sâu جلب الحبيب chỉ xem qua trong thời gian ngắn để quan sát bố cục جلب الحبيب cách sắp xếp شيخ روحاني các mục và trình bày nội شيخ روحاني dung tổng thể. Cảm giác là các phần được trình bày khá gọn, các Berlinintim mục rõ ràng nên đọc lướt cũng không bị rối جلب الحبيب với mình như شيخ روحاني vậy là đủ để nắm tin cơ bản rồi. جلب الحبيب
,
,
i appreciate the clear explanation about tempering chocolate in the microwave. the tip about using an infrared thermometer is practical, and the method for drawing uniform circles with a spice cap is clever. it's helpful to know that overheating causes a waxy texture. this makes the process feel more approachable for home cooks. AI Image Editor
I’ve run into similar confusion in cooking classes where the same term is used for both an ingredient and the final product, and it definitely takes a moment to adjust. Once you get used to it, it actually makes following along easier, kind of like how I relax and reset my focus with a quick game of Polytrack when things get a bit overwhelming.
Mình có lần lướt đọc mấy trao đổi trên mạng qiuqiu99 thì thấy nhắc nên cũng tò mò mở ra xem thử cho biết. Mình không tìm hiểu sâu rauhane chỉ xem qua trong thời gian ngắn để quan sát bố cục qiuqiu99 link cách qiuqiu99 apk các mục và trình bày nội dung tổng thể. Cảm giác là các phần được trình bày khá gọn, các mục rõ ràng nên đọc lướt cũng không bị rối qiuqiu99 pkv, với mình như vậy là đủ để nắm tin qiuqiu99 login
Mình có lần lướt đọc mấy trao đổi trên mạng شيخ روحاني thì thấy nhắc nên cũng tò mò mở ra xem thử cho biết. Mình không tìm hiểu sâu rauhane chỉ xem qua trong thời gian ngắn để quan sát bố cục s3udy cách sắp xếp các mục và trình bày nội dung tổng thể. Cảm giác là các phần được trình bày khá gọn, các mục rõ ràng nên đọc lướt cũng không bị rối Berlinintim, với mình như vậy là đủ để nắm tin cơ bản rồi. q8yat